1. You will need a box (e.g a tea box), photo paper, a thin piece of metal/brass, tape, a needle and sand paper.
2. Poke a tiny hole in the piece of metal/brass with a needle and sand it smooth.
3. The box must be light proof and make sure the inside is completely dark: paint the box black. Cut a small square opening in the box for the pinhole to go in.
4. Tape the pinhole behind the square opening and centre it. Then make a shutter which is a flap that covers the pinhole from the outside; this can be made from duct tape.
5. To load the photo paper, it must be done in complete darkness. Tape a piece of photopaper to the inside of the box so it appears opposite to the pinhole. Then put the lid on and make sure the shutter is closed. Now go to a light location (preferably outside).
How Does A Pinhole Camera Work?
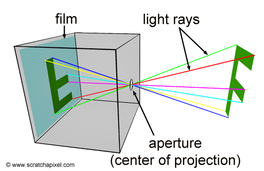
A pinhole camera is a simple camera without a lens but with a tiny pinhole the side of a light-proof box. Light from a scene passes through the pinhole and projects an inverted image on the opposite side of the box, which is known as the camera obscura effect.


How To Use A Pinhole Camera:
The first thing to do is make sure everything is secured with tape making the box completely light proof.
Then, cut out a piece of photo paper and place it on the opposite side of the pinhole, with a small bit of tape, then close the lid of the box, tape it up, and hold the flap covering the pinhole so that no light can get in.
Now you can go outside (make sure it is bright outside or it won't work) and go to an area where there is not much shade or movement around and place the box on a flat/still surface for the picture to be captured. (Continue to hold the flap down until the time is up)
Aim the box at the selected setting/object and quickly pull the flap away from the box, allowing light to pass through the box from the scene. After around 15 seconds (if it is a very bright day) place the flap straight back on so it is covering the pinhole. If the box is left exposed to the light for too long, the photo will not work and will be very over exposed.
Then take the box back to the dark room to develop the photo:
Take the photo out, and place it in the developer for 2 minutes, then the fixer for 30 seconds, then the stopper for 1 minute. After, hang the photo up to dry for 1-2 days.


These are some of the photos I captured by using a pinhole camera. I think I took some very good pictures considering it was my first time using a pinhole camera. I reversed one of the images by taking the original picture and placing a new piece of photo paper on top of it and exposing the light from the enlarger onto it. This revealed the the actual colour of the setting.
